
Selecting the Right Paint and Equipment
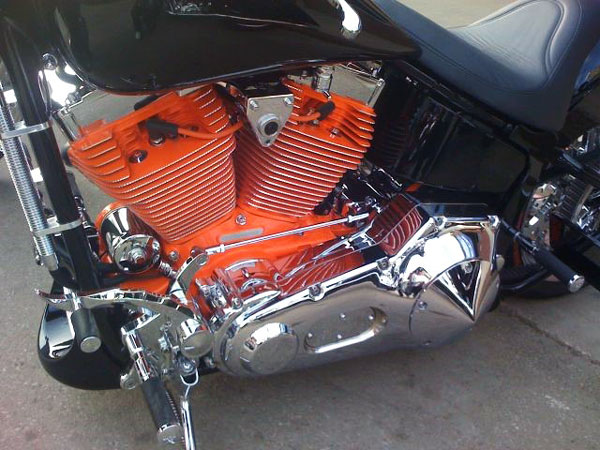
When it comes to painting your motorcycle engine, choosing the right paint and equipment is paramount for achieving a professional and lasting finish. The engine endures high temperatures and constant exposure to environmental elements, so opting for high-quality, heat-resistant paints specifically designed for engines is crucial. These paints not only provide an attractive appearance but also ensure the longevity of your paint job.
To start, explore automotive-grade paints that offer excellent adhesion and resistance to heat, oil, and chemicals. Look for paints with ceramic or enamel properties, as they can withstand the extreme temperatures generated by the engine. Additionally, selecting a paint color that complements your motorcycle’s overall design is essential for a cohesive look.
Equally important is having the right set of tools and equipment for the job. Gather essentials such as paint sprayers, brushes, sandpaper, and cleaning agents. Invest in masking materials to cover delicate engine components and prevent overspray. Quality brushes and airbrushes can help you achieve intricate detailing if you’re considering custom designs.
Remember, the primary keyword for this section is “Selecting the Right Paint and Equipment,” and it’s important to naturally integrate it into the content to optimize for SEO.
Preparing the Engine for Painting
Before diving into the painting process, meticulous preparation of the engine surface is a non-negotiable step. This preparation ensures proper paint adhesion and a flawless finish that stands the test of time. Begin by giving your engine a thorough cleaning to remove dirt, grease, and oil residues. Degreasers are particularly handy in breaking down stubborn grease deposits.
Sanding the engine surface is the next crucial step. Use a fine-grit sandpaper to gently roughen the surface, creating a textured foundation for the paint to grip onto. This process not only enhances adhesion but also helps in leveling out any imperfections on the engine’s surface. Once the sanding is complete, wipe down the engine to remove any sanding dust or residue.
By preparing your engine meticulously, you ensure that the paint adheres uniformly and avoids flaking or peeling over time. The effort you invest in this phase will be reflected in the final, polished outcome of your engine painting project. Incorporate the secondary keyword, if applicable, within the section, while maintaining the informative and professional tone.
Masking and Protecting Engine Components
When you’re ready to begin painting, don’t underestimate the importance of masking and protecting sensitive engine components. Engines have intricate parts that you want to shield from paint overspray, which can result in damage or compromised functionality. Proper masking prevents unintended consequences and ensures a clean, professional finish.
High-temperature masking tape and specialized masking paper are your allies in this endeavor. These materials can withstand the heat generated by the engine and prevent paint from seeping into unwanted areas. Carefully cover components such as electrical connectors, intake ports, and exhaust openings.
Remember, a meticulously masked engine not only safeguards its intricate parts but also showcases your attention to detail and professionalism. While optimizing for the secondary or related keyword, maintain the informative and detailed style to engage readers effectively.
Applying Primer for a Smooth Finish
Primer serves as the foundation for your motorcycle engine’s paint job. It enhances paint adhesion, levels the surface, and provides a uniform base for the topcoat. To begin, ensure that the engine is clean and free from dust or contaminants before applying the primer.
Opt for a high-quality automotive primer designed for engines. Consider using a self-etching primer if the engine surface has any bare metal spots. Apply the primer evenly using smooth, sweeping motions. Don’t rush this step; patience ensures a flawless result.
Once the primer is applied, allow it to dry thoroughly according to the manufacturer’s recommendations. This step is crucial, as it sets the stage for the topcoat application. After the primer has cured, lightly sand the surface to achieve a smooth finish. This step also promotes better adhesion of the paint color.
Remember, this section focuses on the “Applying Primer for a Smooth Finish,” so craft the content accordingly to incorporate the secondary keyword and provide valuable information.
Painting Techniques: Achieving a Professional Look
Achieving a professional-looking paint job requires mastering various painting techniques. Depending on your skill level and the level of detail you desire, you can choose between spray painting, brush-on painting, or airbrushing.
Spray Painting: Spray painting offers an efficient way to cover larger surfaces quickly and evenly. Ensure you have a steady hand and maintain a consistent distance between the spray nozzle and the engine surface. Apply thin, even coats to prevent drips or uneven coverage.
Brush-On Painting: Brush-on painting is ideal for intricate details and small areas. Opt for high-quality brushes designed for fine detailing to achieve smooth and precise lines. This technique requires patience and a steady hand to ensure a professional outcome.
Airbrushing: Airbrushing allows for unparalleled control and precision. It’s perfect for creating gradients, fades, and intricate designs. Practice on a test surface before attempting airbrushing on your engine to master the technique.
Whichever technique you choose, remember to work in a well-ventilated area and follow proper safety precautions, including wearing a mask and protective gear.
Utilize this section to showcase your expertise in various painting techniques while naturally integrating the secondary or related keyword.
Adding Custom Designs and Details
Custom designs and intricate details can transform your motorcycle engine into a true masterpiece. Before applying any paint, take time to plan and sketch your design on paper. This step helps you visualize the end result and make any necessary adjustments before committing to the engine surface.
For custom designs, use painter’s tape to create clean lines and borders. Apply the base color first and allow it to dry before adding details. Small brushes or airbrushes are your allies in this phase, enabling you to bring your envisioned design to life. Whether it’s pinstripes, flames, or abstract patterns, attention to detail is key.
Remember that adding custom designs requires patience and a steady hand. Don’t rush the process; take breaks if needed to maintain your focus. The result will be a unique engine that reflects your creativity and passion for motorcycle customization.
Within this section, incorporate the related keyword while maintaining a high level of detail and professionalism.
Sealing the Paint: Clear Coating for Longevity
After putting in the effort to paint and detail your motorcycle engine, it’s crucial to protect your hard work. Applying a clear coat not only enhances the paint’s appearance but also shields it from UV rays, chemicals, and environmental elements.
Choose a high-quality clear coat designed for automotive applications. Clear coats come in various finishes, such as glossy, satin, or matte. Apply the clear coat evenly and with smooth strokes, ensuring complete coverage. Allow the clear coat to dry according to the manufacturer’s instructions.
The clear coat not only adds durability but also deepens the color and provides a glossy finish that enhances the overall aesthetics of your engine. It acts as a shield against the elements, ensuring that your paint job remains vibrant and pristine over time.
Incorporate the secondary keyword contextually while detailing the importance of clear coating for paint longevity.
Curing and Reassembling the Engine
Once you’ve completed the painting process, patience becomes your ally during the curing phase. Allow the paint and clear coat ample time to cure fully before reassembling the engine components. Follow the manufacturer’s recommendations for curing times to achieve optimal results.
Avoid rushing the process, as premature curing can lead to damage or imperfections in the paint. During this phase, it’s best to keep the engine in a controlled environment with minimal dust and humidity to ensure a smooth and flawless finish.
As the paint and clear coat cure, take the opportunity to inspect your work for any imperfections or areas that might need touch-ups. If you spot any issues, address them with the appropriate techniques before proceeding to the reassembly phase.
When you’re confident that the paint has fully cured, carefully reassemble the engine components you previously protected with masking materials. Exercise care to avoid scratching or damaging the freshly painted surface. Your attention to detail during reassembly contributes to the overall polished look of your painted motorcycle engine.
Maintain a patient and meticulous approach to this phase, which solidifies your commitment to a top-tier paint job. While ensuring you integrate the related keyword seamlessly, focus on imparting valuable insights to your readers.
Maintenance and Care of a Painted Engine
To keep your newly painted motorcycle engine looking its best over time, proper maintenance is essential. Regular cleaning plays a significant role in preserving the paint’s shine and protecting it from the elements.
When cleaning your engine, use a mild automotive-specific soap and water solution. Avoid harsh chemicals that could potentially damage the paint or clear coat. Gently scrub the surface with a soft sponge or cloth, taking care not to apply excessive pressure that could lead to scratching.
After cleaning, dry the engine thoroughly with a clean microfiber cloth to prevent water spots. Avoid using abrasive materials that could mar the paint’s finish. Additionally, consider applying a high-quality wax or sealant designed for automotive surfaces. This step provides an additional layer of protection against UV rays and contaminants.
Regular maintenance not only keeps your engine looking pristine but also showcases your commitment to preserving its aesthetic appeal for the long haul.
Incorporate the related keyword while providing valuable advice on maintaining and caring for the painted engine’s appearance.
Conclusion: Your Motorcycle, Your Masterpiece
In the world of motorcycle customization, painting your engine is a testament to your dedication to aesthetics and craftsmanship. As an engineer, approaching this task with precision and attention to detail is your hallmark. By selecting the right paint, preparing the engine meticulously, mastering painting techniques, and adding custom designs, you create a truly unique and personalized masterpiece.
The journey from selecting the perfect paint to the final touches is a labor of love. It’s a testament to your commitment to transforming your motorcycle into a work of art that turns heads on the road. Through proper maintenance and care, you ensure that your masterpiece stands the test of time, retaining its allure and charm for years to come.
As an expert in motorcycle customization, you now have the tools and knowledge to paint your motorcycle engine with confidence. Embrace the process, unleash your creativity, and embark on a journey that not only revitalizes your motorcycle’s aesthetics but also captures your unique style and vision.
Call to Action: Subscribe to our newsletter for the latest updates, expert tips, and inspiring stories on motorcycle customization. Join our community of passionate enthusiasts and stay connected with the world of engineering-driven creativity.